Interior vs. Exterior Painting: Key Differences and TechniquesInterior vs. Exterior Painting: Key Differences and Techniques


When sprucing up your home, few projects can transform the look and feel like a fresh coat of paint. Whether brightening up a living room with a new shade or refreshing the exterior to boost curb appeal, painting plays a pivotal role in home maintenance and aesthetics. However, not all painting projects are created equal, and the differences between interior and exterior painting go far beyond the choice of colours. Understanding these key distinctions and the specific techniques suited for each can significantly impact the success of your painting endeavour.

In this blog post, we’ll delve into the essential differences between interior and exterior painting, from the types of paint used to the durability requirements and application methods. We’ll explore why certain paints are better suited for the harsh conditions of the outdoors, while others are preferred for creating a cosy atmosphere indoors. 

Additionally, we’ll provide practical tips and techniques to help you achieve professional-quality results, whether revamping your living room or giving your home’s facade a facelift. Whether you’re a seasoned DIY enthusiast or gearing up for your first painting project, this guide will give you the knowledge you need to make informed decisions and ensure a long-lasting, beautiful finish.

Interior vs. Exterior Painting

Understanding the Basics

Interior Painting

Interior painting is more than just a decorative change; it’s an opportunity to create a mood, enhance the aesthetics of a home, and protect surfaces from wear and tear. The primary purpose of interior painting is to add colour, texture, and personality to living spaces. It allows homeowners to personalise their environments to reflect their tastes and lifestyles. The characteristics of interior paint jobs often involve meticulous preparation and the selection of paints that are safe for indoor air quality and easy to maintain.

The most commonly used types of paints for interior projects include water-based (latex) and oil-based (alkyd) paints. Water-based paints are favoured for their quick drying times, ease of clean-up, and low volatile organic compound (VOC) levels, which make them safer for indoor air. On the other hand, oil-based paints are prized for their durability and smooth finish, though they require more time to dry and emit higher levels of VOCs.

Homeowners embarking on interior painting projects face several challenges and considerations. Ventilation is a key concern, especially when using oil-based paints, to ensure harmful fumes don’t linger. Disruption to living spaces is another factor, as furniture needs to be moved, and areas need to be sectioned off to avoid paint splatters. Choosing the right paint finish—from matte to high gloss—also plays a crucial role in both the appearance and maintenance of the painted surfaces.

Exterior Painting

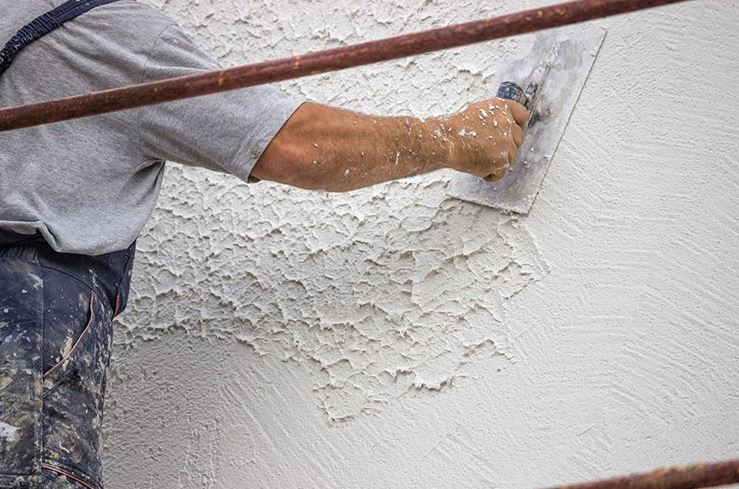
Exterior painting serves a dual purpose: it protects the home from environmental elements and enhances its curb appeal. This painting project requires paints that can withstand the rigours of weather, including sun exposure, rain, wind, and temperature fluctuations. Exterior paints are formulated to be more durable, with additives that resist fading, mildew, and peeling.

Acrylic, latex, and oil-based paints are commonly selected for exterior projects. Acrylic and latex paints offer excellent colour retention and flexibility, making them ideal for resisting temperature changes without cracking. Oil-based paints are used for their superior adhesion and water resistance, providing a strong protective layer against moisture and wear.

The challenges and considerations of exterior painting are distinct from interior projects. Weather conditions are significant in planning an exterior paint job, as temperature and humidity can affect the paint’s drying time and finish. Durability is a major concern, with homeowners needing to choose paints that look good and protect their homes for years to come. Preparation work, including power washing and repairing surface imperfections, is more intensive for exterior painting to ensure a long-lasting finish.

Key Differences Between Interior and Exterior Painting

The composition of interior and exterior paints is tailored to their specific environments. Exterior paints are formulated with additives that provide UV resistance to prevent fading and flexibility to endure temperature changes without cracking. Interior paints, meanwhile, are designed with lower VOC levels to ensure indoor air quality and safety for occupants. This distinction ensures that paints perform optimally in their intended settings, providing durability where needed and safety where it matters most.

Durability is a concern for both interior and exterior paints, but for different reasons. Exterior paints must withstand the elements, resisting damage from UV rays, rain, wind, and temperature changes. This demands a formulation that can endure harsh conditions for years. Interior paints, while not exposed to the same environmental stressors, need to resist wear and tear from daily activities, such as cleaning, touching, and furniture scuffs, necessitating a different approach to durability.

Different factors influence colour selection for interior and exterior painting. Exterior paint colours are often chosen based on how they look in natural light and their ability to complement the surrounding environment and architectural style. Interior colours, however, are selected based on interior lighting, room size, and personal preference, focusing on creating a desired atmosphere within the home.

Preparation for exterior painting is more labour-intensive, involving power washing to remove dirt and grime, scraping off loose paint, and repairing surfaces. Interior painting preparation typically involves cleaning walls, filling holes, and ensuring a smooth surface for painting. The application process also differs, with exterior painting requiring specialised techniques and tools to handle different surfaces and weather conditions. In contrast, interior painting offers more flexibility in technique and a greater focus on detail and finish.

Techniques for Successful Painting

Interior Painting Techniques

To ensure a successful interior painting project:

  1. Begin with thorough room preparation.
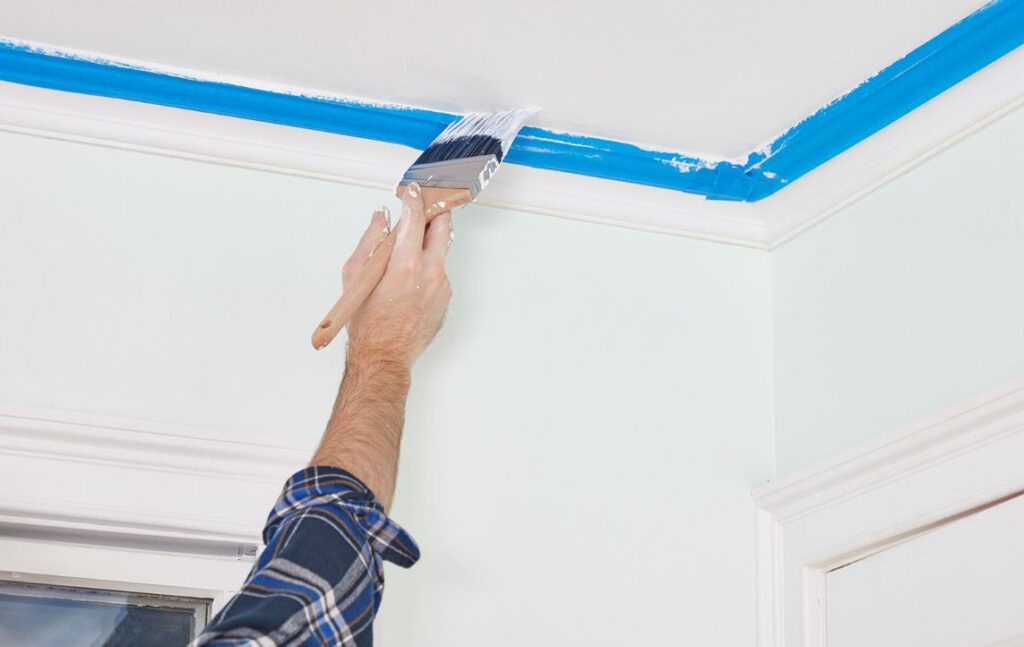
  2. Remove or cover furniture, and use painter’s tape to protect trim and ceilings.
  3. Ensure walls are clean, dry, and smooth; repair any holes or imperfections with spackle and sand as necessary.

Priming is crucial for ensuring an even base, especially when making drastic colour changes or painting over surfaces with existing stains. It can improve paint adhesion, resulting in a more uniform appearance.

During the painting process, start from the top (ceilings) and work down to walls and trim. Use angled brushes for edges and corners and rollers for broad wall sections. Apply paint in a series of overlapping “W” or “V” patterns for a smooth finish, then smooth over with long, even strokes.

Choosing the right sheen is also important. Matte or flat paints are forgiving on imperfections but less durable, making them ideal for low-traffic areas. Glossier finishes, like satin or semi-gloss, are easier to clean and better suited for kitchens, bathrooms, and trim.

Exterior Painting Techniques

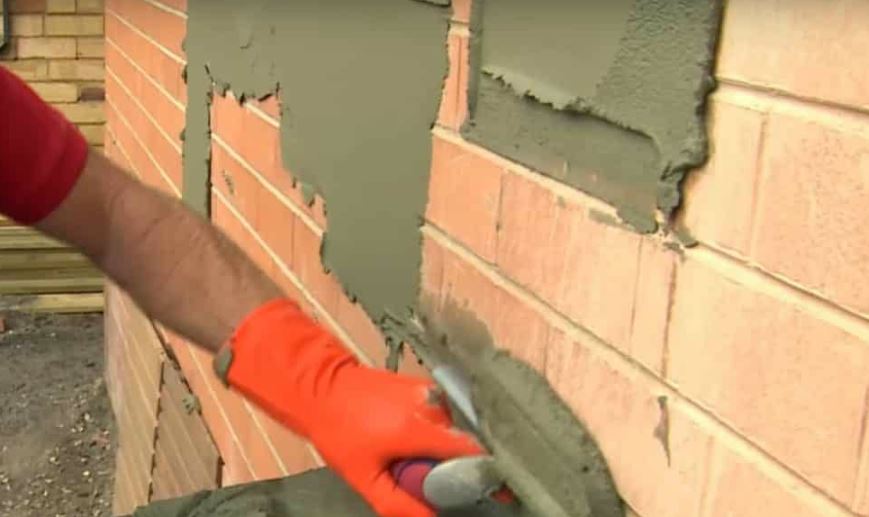
Exterior painting requires careful timing and preparation. Clean the home’s exterior with a power washer to remove dirt and loose paint. Scrape off peeling paint and sand rough areas to ensure a smooth base. Repair any damage to siding or trim before proceeding.

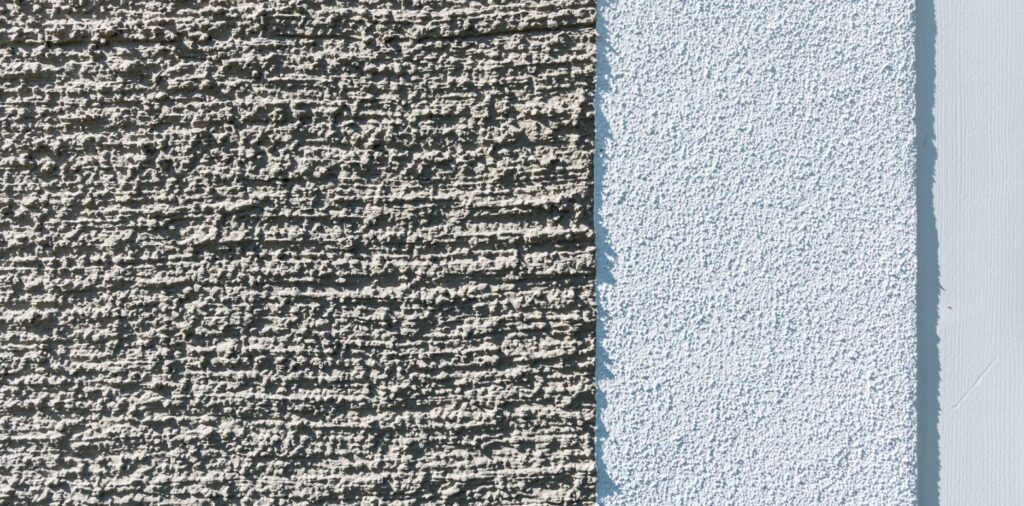
Priming is essential for exterior surfaces, especially on exposed wood or areas with previous damage. It creates a solid foundation for the topcoat to adhere to, improving durability and coverage.

When painting, start on the shady side of the home to avoid direct sunlight, which can cause the paint to dry too quickly and lead to uneven application. Use brushes for detailed areas and rollers or sprayers for large surfaces. Consistently apply paint, maintaining a wet edge to avoid lap marks.

Be mindful of weather conditions. Avoid painting on extremely hot days, in direct sunlight, or when rain is expected within 24 hours. Safety is paramount, so use ladders and scaffolds responsibly and wear protective gear as needed.

Maintenance and Longevity

Maintaining interior paint involves regular cleaning and touch-ups. Dust and clean painted walls with a soft, damp cloth, avoiding harsh chemicals that can damage the finish. Address scuffs or chips promptly with touch-up paint, using the original paint if available for the best colour match.

Interior vs. Exterior Painting

To extend the life of an exterior paint job, conduct regular inspections, especially after severe weather conditions. Clean the exterior annually to remove dirt and mildew, which can degrade the paint over time. Touch up any chips or cracks to prevent moisture from penetrating and causing damage. Consider applying a fresh coat of paint every 5 to 10 years, depending on the paint’s quality and the home’s exposure to elements.

When to Hire a Professional

Deciding to hire a professional painter depends on the project’s scope, your skill level, and available time. For example, GB Painters in Brisbane Northside can deliver the best results for large projects, high or hard-to-reach areas, or when a high-quality finish is crucial.

Look for a professional service with good reviews, proper licensing, and insurance. Ask for detailed quotes and timelines. Prepare your home by moving furniture and valuables, and discuss any specific requirements or concerns with the painters before work begins.

In conclusion, understanding the distinct differences between interior and exterior painting techniques is crucial for any home improvement project. Interior painting allows for a personal touch to living spaces, requiring careful selection of paint types, preparation, and application techniques to create a welcoming atmosphere. On the other hand, exterior painting demands a focus on durability and protection against the elements, with specific paint formulations designed to withstand harsh conditions and maintain curb appeal.

We’ve explored the importance of choosing the right paint composition, considering durability requirements, making informed colour selections, and adhering to proper preparation and application processes. These considerations ensure an aesthetically pleasing result and a long-lasting finish that protects and enhances the value of your home.

Moreover, we delved into the techniques that guarantee success, from room and surface preparation to the application itself and the maintenance practices that will extend the life of your paint job. Whether you’re planning to refresh the interior or protect the exterior of your home, these insights can guide you toward achieving professional-quality results.

As you embark on your next painting project, remember the significance of these factors in ensuring your work’s quality and durability. Considering the specific challenges and requirements of interior versus exterior painting will help you make informed decisions, whether selecting materials, preparing surfaces, or applying the paint. And when the project’s scope goes beyond your comfort zone, knowing when to call in professional painters can make all the difference.

By taking these key differences and techniques into account, you can confidently approach your painting projects, ensuring a beautiful and lasting finish that you’ll enjoy for years to come.

A New Perspective: Creative Ceiling Painting Ideas for InspirationA New Perspective: Creative Ceiling Painting Ideas for Inspiration


When we think about transforming a space, our eyes often focus on walls, furniture, and flooring. Yet, a canvas above us holds immense potential for creativity – the ceiling. Often referred to as the ‘fifth wall,’ the ceiling offers a unique opportunity to infuse art and personality into any room. In this blog post, we aim to elevate your interior design game by turning your gaze upwards.

From the awe-inspiring frescoes of the Sistine Chapel to contemporary abstract designs, ceiling painting has a rich history that blends art with architecture. In modern interior design, a well-thought-out ceiling can dramatically alter the perception and feel of a space. Whether you’re a homeowner seeking a refreshing change or an interior design enthusiast looking for new ideas, this post will provide many creative ceiling painting concepts to ignite your imagination.

Join us as we explore artistic ideas, from serene sky murals to bold geometric patterns, and provide practical tips for those ready to embark on their ceiling painting adventure. Get ready to be inspired and discover how the right ceiling design can transform your space into a masterpiece.

Ceiling Painting

Historical Context of Ceiling Art

The history of ceiling art is as rich and diverse as the cultures that have contributed to it. One of the most renowned examples is the Sistine Chapel ceiling, painted by Michelangelo between 1508 and 1512. This masterpiece of the Renaissance period is not just a testament to artistic skill but also the ceiling’s role as a canvas for storytelling and expression. In many ancient civilizations, ceilings were adorned with frescoes, mosaics, and intricate patterns, often depicting religious, mythological, or celestial themes.

Over the centuries, ceiling art evolved. The Baroque period brought dramatic, illusionistic painting techniques, making ceilings appear higher, more spacious, or even open to the sky. Rococo style introduced lighter themes and pastel colours, moving from the grandiose to the intimate and whimsical. In the modern era, ceiling art became more diverse. Art Nouveau introduced flowing, naturalistic designs, while Art Deco embraced geometric patterns and bold colours. Today, ceiling art encompasses many styles, from traditional frescoes to contemporary installations, reflecting the broad spectrum of modern artistic expression.

The Importance of Ceiling Design in Modern Interiors

In contemporary interior design, the ceiling is often called the ‘fifth wall’ due to its potential to impact a room’s aesthetics and atmosphere. Far from being a blank space, ceilings can dramatically alter the perception of a room’s size, height, and overall ambience. A well-designed ceiling can add depth, character, and a sense of completeness to a space. It can also reflect personal style, a bold artistic statement, or a subtle complement to the room’s overall theme.

Ceiling painting, in particular, can create illusions of space – a dark colour can make a high ceiling seem lower and cosier, while light colours can make a small room feel more spacious and airy. Intricate designs can draw the eye upwards, adding a dimension of depth and luxury, while minimalist approaches can complement a room’s modern and sleek aesthetic.

Creative Ideas for Ceiling Painting

Idea 1: Sky and Cloud Murals

Sky and cloud murals are a timeless choice for ceiling painting, bringing a sense of openness and tranquillity to any room. To achieve a realistic sky effect, start with a base of soft blue, gradually blending in whites and lighter blues to create the appearance of depth. Adding subtle gradients can mimic the natural variation in the sky. For clouds, use a feathering technique with white and light grey to create fluffy, realistic formations. The key is to create a sense of movement and lightness, making the ceiling feel like an extension of the outdoors.

Idea 2: Geometric Patterns

Geometric patterns can add a modern and dynamic touch to a room. From simple chevrons to complex tessellations, these designs can be adapted to fit any style. When choosing colours, consider the room’s overall colour scheme and how the ceiling complements or contrasts it. Balancing bold patterns with neutral tones can prevent the design from overwhelming the space. Use painter’s tape to create sharp lines and angles, ensuring a professional and precise finish.

Idea 3: Floral and Botanical Themes

Floral and botanical themes bring the beauty of nature indoors, creating a serene and refreshing ambience. This style can range from subtle, minimalist designs to elaborate, colourful displays. When painting detailed botanical elements, use a variety of brush sizes for different levels of detail and texture. Consider the room’s lighting and how it will interact with the colours and shapes of the floral design to create a dynamic, evolving artwork.

Idea 4: Abstract Art

Abstract art on ceilings offers unlimited possibilities for creativity and personal expression. This style can range from subtle colour washes to bold, expressive shapes and lines. Abstract art allows for experimentation with colour, form, and texture. Incorporate elements that resonate with your style or the mood you want to create in the space. Abstract ceiling art can be a conversation starter and a unique focal point in any room.

Tips for DIY Ceiling Painting

Embarking on a DIY ceiling painting project can be a rewarding endeavour. Here’s a step-by-step guide to ensure you achieve the best results:

Preparation:

  • Clear the room, move furniture to the centre, and cover it with drop cloths.
  • Clean the ceiling to remove dust or cobwebs.
  • Apply painter’s tape along the edges where the ceiling meets the walls.

Choosing the Right Paints and Tools:

  • Opt for high-quality ceiling paint, which is thicker to reduce drippings.
  • Select the appropriate brushes and rollers. A roller with an extension pole is ideal for ceilings.
  • Consider the finish – matte or flat finishes help hide imperfections.

Safety Tips:

  • Use a stable ladder or scaffolding, ensuring it’s securely positioned.
  • Wear protective gear like goggles and a mask to avoid paint drips and fumes.
  • Work in a well-ventilated area.

Hiring Professional Artists

For intricate or complex designs, hiring a professional artist may be advisable. Here’s how to approach this:

When to Hire a Professional:

  • Consider professional help for detailed murals, high ceilings, or artistic techniques.
  • If safety is a concern or the project requires specialised equipment.

Finding and Working with Artists:

  • Research local artists or companies with experience in ceiling painting, like finestfinishpd.com.au.
  • Review their portfolios to find a style that matches your vision.
  • Communicate your ideas clearly and be open to professional suggestions.
Ceiling Painting

Maintenance and Longevity of Ceiling Paintings

To ensure your ceiling painting remains as vibrant as the day it was completed:

Maintenance Tips:

  • Dust the ceiling regularly to prevent cobweb and dust accumulation.
  • Address moisture issues, as humidity can damage the paint over time.
  • Use a soft, dry cloth for cleaning; avoid harsh chemicals or abrasive materials.

Ensuring Longevity:

  • Consider a protective varnish or sealant, especially for high-moisture areas.
  • Touch up any chips or cracks promptly to prevent further damage.

Showcase of Real-Life Examples

To inspire your ceiling painting journey, let’s explore some real-life examples:

Photos and Stories:

  • Share before-and-after photos of transformed spaces.
  • Highlight unique designs like a night sky in a child’s bedroom or an ornate floral pattern in a dining room.

Interviews and Quotes:

  • Feature insights from homeowners who undertook ceiling painting projects.
  • Include tips and reflections from professional artists on their most memorable projects.

In this exploration of ceiling painting, we’ve delved into its historical roots, impact on modern interior design, and an array of creative ideas ranging from serene sky murals to bold abstract art. We’ve also provided practical tips for DIY enthusiasts and guidance on working with professionals.

Ceiling painting is more than just an aesthetic enhancement; it’s a form of expression that adds character and depth to your space. Whether you choose to take on a project yourself or collaborate with an artist, the transformation of your ceiling can profoundly impact your interior’s ambience.

We encourage you to look up and imagine the possibilities. Embrace the ‘fifth wall’ as your canvas and let your creativity soar to new heights!

The Science of Paint: Understanding Formulas, Finishes, and DurabilityThe Science of Paint: Understanding Formulas, Finishes, and Durability


From the rustic murals of ancient civilizations to the vibrant canvases that grace modern art galleries, paint has always been a profound medium of expression. Yet, beyond its artistic merit, paint is also a marvel of science, with its makeup, finish, and durability heavily rooted in intricate chemical processes. 

As homeowners seek the perfect shade to rejuvenate a room or as artists choose their palette, understanding the science behind paint becomes essential. Whether you’re an artist, an interior designer, or someone keen on DIY home projects, delving into the formulas, finishes, and longevity of paint can empower you to make informed choices. 

The Science of Paint

In this article, we’ll journey through the intricacies of paint science, unravelling the magic that transforms liquid into lasting colour.

Basic Ingredients of Paint

  • Pigments: At the heart of any paint is its pigment, which determines its colour. Pigments are fine powder-like substances sourced either organically or inorganically. Their primary function is to provide colour and coverage. The quality and type of pigment influence the paint’s opacity, determining how well a paint can cover the underlying surface.
  • Binders: Acting as the adhesive that holds the pigment particles together and to the painted surface, binders are crucial in ensuring the paint’s durability. Once the paint dries, binders harden, creating a cohesive film that locks the pigment in place. The type of binder used affects the paint’s finish – whether glossy or matte – and its resistance to external elements.
  • Solvents: Think of solvents as the vehicle that carries the pigment and binder. They keep the paint in a liquid state until application. Once the paint is applied, the solvent evaporates, leaving behind the binder and pigment on the surface. Water-based paints use water as their primary solvent, while oil-based paints often use organic solvents.
  • Additives: These are the special agents added to paint to enhance its performance. Additives can improve flow, combat mildew, speed up drying time, and provide numerous other benefits. Their presence, although typically in smaller quantities than other ingredients, can vastly influence a paint’s behaviour and finish.

Chemistry Behind Paint Formulation

The interplay between these ingredients is complex and fascinating at the molecular level. For paint to function as desired, its formulation must ensure that the pigment disperses evenly in the solvent, aided by the binder. Balancing these ingredients is an art in itself. Too much solvent and the paint might be too thin, requiring multiple coats; too little, and it could be too thick, leading to an uneven application.

Moreover, modern demands have driven innovations in paint formulations, especially towards eco-friendly and low-VOC (Volatile Organic Compounds) paints. VOCs are harmful compounds that can off-gas from paints, leading to indoor air pollution. The push for greener alternatives has prompted chemists to develop formulations that reduce these emissions while maintaining paint quality.

Different Paint Finishes and Their Properties

Beyond the basic composition, the finish of a painting is its defining character. The choice of finish can drastically alter the look and feel of a space or artwork.

  • Matte: The quintessential choice for interior walls, matte paints offer a smooth, non-reflective finish. Their lack of shine helps hide imperfections on the surface, making them ideal for older walls with flaws. However, they can be more susceptible to marks and require careful cleaning.
  • Eggshell: With a slight hint of shine, eggshell finishes strike a balance between matte and glossy. They are more washable than matte paints and offer a subtle warmth to walls, making them popular for living rooms and bedrooms.
  • Satin: Satin paints have a smooth, velvety appearance with a moderate sheen. They resist dirt and mildew better than matte finishes, making them suitable for kitchens, bathrooms, and high-traffic areas.
  • Semi-Gloss and Gloss: These are your go-to options if you’re looking for shine. Semi-gloss paints are slightly less shiny than gloss paints, but both are highly durable, moisture-resistant, and easy to clean. They’re often chosen for trim, doors, and areas that experience heavy use or moisture, like bathrooms.

Factors Influencing Paint Durability

Aesthetic appeal aside, paint’s longevity is paramount, especially for surfaces prone to wear and tear. Several factors come into play:

  • The Role of Binders: As mentioned earlier, binders solidify to create a cohesive film that protects the pigment. The type and quality of the binder determine how well a paint can resist wear, tear, and external aggressions. For instance, acrylic binders are often favoured for their excellent durability and resistance to yellowing.
  • Environmental Factors: The environment plays a critical role in paint degradation. High humidity can lead to peeling, while excessive sunlight might cause fading. Extreme temperature changes, too, can cause paint to crack. Choosing paints formulated for specific environmental conditions is key to ensuring longevity.
  • Surface Preparation: One can’t stress enough the importance of this step. A well-prepared surface can significantly enhance paint adhesion and durability. This means cleaning the surface, ensuring it’s dry, and using the right primer.

Innovations in Paint Technology

As technology continues to evolve, so do the capabilities of paint:

The Science of Paint
  • Nanotechnology: By manipulating particles at a microscopic level, nanotechnology has given rise to paints that are more durable and come with added functionalities like self-cleaning or heat-reflective properties.
  • Smart Paints: Imagine a wall that changes colour with a button or paints that can purify the air. These aren’t science fiction; advancements in paint technology have made them a reality.
  • Sustainable Paints: With growing environmental concerns, the market has seen a rise in biodegradable and recyclable paints. These eco-friendly options reduce environmental impact without compromising on quality.

Selecting the Right Paint for Your Project

All the commercial and residential painting projects are unique, and understanding how to choose can make all the difference:

  • Purpose, Environment, and Finish: Before diving into colour swatches, consider the purpose of the space, the environment it’s in, and the desired finish. A bathroom may require moisture-resistant paint with a semi-gloss finish.
  • Understanding Labels: Labels can be a treasure trove of information. Look for terms like VOC to gauge eco-friendliness or claims of mildew resistance for damp areas.
  • Testing Paint Samples: A colour can look dramatically different under varied lighting conditions. Before committing, it’s wise to test paint samples at different times of the day and under artificial lighting.

From our ancestors’ caves to today’s sophisticated homes, paint has been an integral part of human expression. But as we’ve journeyed through its science, it’s evident that paint is not just about colour—it’s about chemistry, durability, technology, and sustainability. As we adorn our spaces, understanding this science empowers us to make choices that are aesthetically pleasing, stand the test of time, and benefit our environment. Knowledge indeed becomes the most vibrant shade in the vast palette of options.

Top Mistakes to Avoid in DIY Brick Rendering: Why Professionalism MattersTop Mistakes to Avoid in DIY Brick Rendering: Why Professionalism Matters


Brick rendering, the art of applying a protective and decorative layer over brickwork, has been a time-honoured technique to enhance the longevity and appearance of buildings. In today’s era, where do-it-yourself (DIY) projects are gaining immense popularity, many homeowners are tempted to take up the trowel and embark on brick-rendering adventures. 

While the enthusiasm to take matters into our own hands is commendable, brick rendering is not just about slapping on some plaster. It’s a delicate craft with its own set of intricacies. The decision to DIY or hire a professional isn’t just about cost; it’s about ensuring the job is done correctly, preventing unnecessary mistakes, and achieving the desired result. 

Brick Rendering

In this blog post, we’ll delve into some of the most common pitfalls in DIY brick rendering and explore why leaning on professionalism can sometimes make all the difference.

Common Mistakes in DIY Brick Rendering

Brick rendering can transform the appearance and durability of a structure. However, DIY attempts can sometimes lead to less-than-desirable outcomes. Below, we discuss some common mistakes DIY enthusiasts make during brick rendering projects and how to avoid them.

Poor Surface Preparation

Not cleaning the brick surface properly
The first step in rendering is ensuring that the brick surface is immaculate. Dust, grime, moss, or any other contaminants can hinder the adherence of the render, leading to a weak bond. Using a good brick cleaner and a stiff brush is essential. For tougher stains or growths, pressure washing might be a viable option. Yet, caution is required to avoid damaging the bricks.

Failing to fix cracks or damage before rendering
Rendering over damaged or cracked bricks is akin to building a house on a weak foundation. It might look good initially, but those imperfections will soon resurface, causing the rendering to crack or fall off. Always ensure all damage is fixed and the surface stable before rendering.

Incorrect Material Choice

The differences in rendering materials
From cement renders to lime and acrylic ones, a wide range of materials are available for brick rendering. Each type has its advantages and limitations. For instance, acrylic renders dry quickly and comes in various colours but might not be as durable as its cement counterparts.

Why some are unsuitable for certain brick types
Not all rendering materials suit all. For example, older bricks, which are softer, might benefit from a lime render due to their breathability, whereas modern bricks can handle the more rigid cement render.

Inappropriate Mixing of Rendering Materials

Importance of getting the right consistency
Achieving the right consistency is paramount. Too thick, and the mixture won’t spread evenly; too thin, and it may not adhere properly. Always follow manufacturer guidelines, and if in doubt, seek professional advice.

Risks of over or under-mixing
Over-mixing can introduce air bubbles, leading to a weaker finish. Under-mixing can result in an inconsistent mix, where some parts may be drier than others. This inconsistency can lead to uneven drying and reduced structural integrity.

Improper Application Techniques

Uneven thickness leading to potential cracks
One of the most common errors in DIY rendering is applying the mix unevenly. When some sections are thicker than others, it can lead to differential drying rates, resulting in cracks. Using a straight edge or darby helps in achieving a consistent thickness.

Failing to layer appropriately
Some rendering jobs require multiple layers, especially if aiming for a polished or particular finish. Hastily applying a single thick layer instead of multiple thin ones can lead to reduced adherence and a higher risk of cracking.

Not Taking Weather Conditions into Account

Rendering in too cold or hot temperatures
Temperature plays a vital role in drying. Extremely cold conditions can cause the render to freeze, whereas very hot conditions can lead to rapid drying, preventing proper curing.

Risks of drying too quickly or slowly
When render dries too quickly, it can lead to shrinkage cracks. On the other hand, when it dries too slowly (maybe due to high humidity), it can lead to a weakened bond with the brick surface.

Inadequate Protection Post-Application

Not allowing enough drying time
Patience is crucial. Rushing to paint or finish the rendered surface before it’s completely dry can compromise the outcome. Always refer to the manufacturer’s recommended drying times.

Failing to seal or protect the rendered surface
A protective sealant should be applied to guard against water infiltration and other environmental factors after drying. This step enhances the render’s longevity and maintains its aesthetic appeal.

Overlooking the Importance of Maintenance

Thinking it’s a one-time job
Rendering is durable but not indestructible. Homeowners often make the mistake of thinking that no further action is required once they render their bricks.

Ignoring the wear and tear
Like any other part of a house, rendered surfaces are subject to wear and tear. Regular checks for cracks, discolouration, or any other signs of damage, followed by timely repairs, can ensure that the rendered surface remains in top condition for years.

Benefits of Hiring a Professional

Proper understanding of materials and techniques
A seasoned professional brings years of experience and knowledge. They are well-versed in understanding the nuances of different rendering materials, how they interact with various brick types, and the best techniques for applying them.

Access to the latest tools and equipment
Like any other industry, brick rendering evolves with better tools and technologies. Professionals ensure they have access to the latest equipment, guaranteeing precision and efficiency that’s hard to achieve with typical DIY tools.

Saves Time and Money in the Long Run

Less likelihood of mistakes leading to redoing or repairs
A single misstep in a DIY project can lead to time-consuming and costly repairs. With their vast experience, professionals are less likely to make these mistakes, ensuring the job is done right the first time.

Brick Rendering

Professionals can often get materials at discounted rates
Owing to their industry connections and bulk buying capabilities, professionals can often secure materials at a lower cost, leading to overall savings for the homeowner.

Insurance and Guarantees

Peace of mind in case of unexpected issues
Professionals typically carry insurance that covers any accidental damages during the rendering process. This gives homeowners peace of mind, knowing that any unforeseen issues will be dealt with professionally without additional costs.

Warranty on the work performed
Many professional rendering services offer warranties on their work, assuring homeowners of the longevity and durability of the rendered surface.

Aesthetic Superiority

Smooth, even finish
Achieving a flawless finish requires skill and expertise. Through their extensive training and experience, professionals can ensure a perfectly smooth and even render finish that’s often hard to achieve with DIY methods.

Better overall visual appeal
Professionals have an eye for aesthetics beyond the technicalities. They can advise on colour choices, finishes, and textures that complement the overall look and feel of the home, enhancing its curb appeal.

Choosing between a DIY approach and hiring a professional for brick rendering involves more than just evaluating the initial cost. It’s about understanding the long-term value in terms of durability and aesthetics. While DIY projects can be immensely satisfying, they come with challenges, especially in specialized tasks like brick rendering. 

On the other hand, investing in a professional’s expertise guarantees precision, longevity, and an impeccable finish. When weighing the pros and cons, homeowners should consider the true value of professionalism and the peace of mind it brings, ensuring that their home remains a beautiful and sturdy sanctuary for years to come.

Transforming Interiors: Cement Rendering Applications Inside the HomeTransforming Interiors: Cement Rendering Applications Inside the Home


In the vast world of interior design, cement rendering is making waves like never before. Historically recognized for its robust and protective role in building exteriors, this versatile material has creatively journeyed from the façade of homes to becoming a star player in interior transformations.

As homeowners and designers seek fresh, sustainable, and modern design aesthetics, cement rendering has emerged as an avant-garde solution that fuses function with finesse. Dive into this article to explore how cement rendering can be the key to unlocking a new realm of decorative possibilities inside your home.

Cement Rendering Applications

What is Cement Rendering?

Cement rendering is the art of applying a mix of cement, sand, and sometimes lime to a wall or surface, whether brick, stone, or mud brick. Its primary composition sees a balance between cement and sand, providing a textured or smooth finish, which acts as armour against the external environment. Originally, cement rendering’s most common use was to coat the exterior of houses. It served a dual purpose: protection from weather elements and enhanced aesthetic appeal. Think of historical buildings, Mediterranean homes, or even ancient constructions; cement rendering has been integral to building practices for centuries, albeit in different forms and compositions.

Benefits of Cement Rendering Inside the Home

Cement rendering is no longer just an external wall treatment; its benefits have found resonance inside our homes as well:

  • Durability: One of the prime advantages of using cement rendering indoors is its ability to withstand wear and tear. Unlike wallpapers or paints, which may chip, peel, or fade over time, a well-done cement render can last for years with minimal maintenance.
  • Versatility: The malleability of cement render means it can be moulded and shaped into different textures, patterns, and finishes. This adaptability gives designers a canvas to showcase creativity and gives homeowners the flexibility to change and adapt to evolving tastes.
  • Improved Insulation: A cement-rendered wall can provide added insulation, both thermal and acoustic, to your home, making it cooler in the summers and warmer in the winters.
  • Aesthetic Appeal: The sleek, modern, and industrial appearance of cement renders can transform any space, making it look contemporary and chic.

Popular Interior Applications

While traditionally used for exteriors, here’s how cement rendering can change the game inside the home:

  • Feature Walls: These walls act as a focal point in rooms. A cement-rendered feature wall can add depth and character in a living room or bedroom. Plus, with various texturing techniques, every feature wall can have its unique charm.
  • Fireplaces: The fire resistance qualities of cement rendering are a boon for fireplace surrounds. While it enhances safety, the aesthetic transformation it provides to traditional fireplaces is undeniable.
  • Floors: Who said cement is only for walls? As a flooring solution, cement rendering presents a cost-effective, durable, and low-maintenance alternative to conventional floorings like wood or tiles.
  • Bathroom Walls: The water-resistant quality of cement renders makes it a perfect fit for bathrooms. Plus, the smooth finish offers a spa-like, luxe modern ambience.
  • Kitchen Backsplashes: For a kitchen, cleanliness is paramount. Cement-rendered backsplashes provide an easy-to-clean, seamless backdrop against culinary adventures.

Techniques & Finishes

Cement rendering can be as unique as one’s imagination. Here’s a look at some popular finishes:

Cement Rendering Applications
  • Smooth Finish: Aimed at achieving a sleek, minimalist, and modern look, a smooth finish is perfect for contemporary homes.
  • Textured Finish: For those who crave character and depth in their interiors, a textured finish is the way to go. By incorporating patterns, a room can instantly have an elevated look.
  • Trowel Finish: This provides a rustic or industrial touch. It’s all about creating that raw, unpolished, but incredibly stylish ambience.
  • Coloured Render: Gone are the days when cement was just grey. With the addition of pigments, cement rendering can now adopt various shades, adding a burst of colour to spaces.

Care and Maintenance

Apart from its aesthetic appeal, cement rendering’s beauty lies in its relatively hassle-free maintenance. Here’s a quick guide on how to keep it in tip-top shape:

  • Tips on Cleaning Rendered Surfaces: Unlike painted walls that may lose colour or wallpapers that might peel, cement-rendered surfaces can be cleaned with mild soapy water and a soft brush. For tougher stains, a gentle pH-neutral detergent will do the trick. However, avoid abrasive chemicals or high-pressure washing to prevent damage.
  • The Importance of Sealing: Cement-rendered walls and floors can stain like any other surface. Applying a sealant post-rendering, especially in high-traffic or moisture-prone areas, is crucial to prevent unwanted stains and ingress.
  • Longevity and Potential for Touch-ups: The best part about cement rendering is its long lifespan. However, should minor damages occur, spot touch-ups are feasible without redoing the entire surface. This ensures that the rendered surfaces look fresh for years to come.

Cost Implications

Every homeowner wants value for money, and understanding the financial implications is key:

  • Cost Comparison with Other Interior Finishes: While the upfront cost of cement rendering may seem higher compared to paint or wallpaper, its longevity and minimal maintenance often make it a cost-effective solution in the long run.
  • Factors Affecting the Price: The final price isn’t just about materials. Surface area, chosen finish (textured, coloured, or smooth), and labour costs can all influence the total cost. It’s always best to get a detailed quote before commencing.

Considerations Before Choosing Cement Rendering

Before diving into the world of cement rendering, some pre-planning and considerations can make the process smoother:

  • Assessing the Structure of the Home: Not all walls may be suitable for cement rendering. An assessment to ensure the structural integrity and appropriateness of surfaces is essential.
  • Moisture Levels and Ventilation Considerations: Cement rendering in moisture-heavy areas requires proper ventilation to prevent mould growth and other related issues.
  • Hiring Professionals vs. DIY: While the DIY route might seem enticing, cement rendering requires expertise for that flawless finish. Professionals can ensure consistency, address challenges, and offer guidance on the best techniques and finishes.

Cement rendering is not just a trend; it’s a revolution in interior design. From its robust nature to its seamless appeal, it offers a unique blend of function and aesthetics. Homeowners seeking a harmonious blend of tradition and modernity, durability, and design can find their answer in this versatile material. As we’ve journeyed through its myriad applications and benefits, it’s evident that cement rendering holds transformative potential for interiors. So, the next time you think of giving your space a facelift, remember the cemented charm and consider embracing it for a chic, lasting impression.

Brushes vs. Rollers: Choosing the Right Tools for Your Painting ProjectBrushes vs. Rollers: Choosing the Right Tools for Your Painting Project


Imagine embarking on a painting project, eager to transform a space, only with streaky walls or uneven patches. The culprit? Not necessarily the quality of the paint or your painting technique but the tools you chose. In the world of painting, brushes and rollers are the stars of the show, but knowing when and how to use each can significantly impact the quality of your results. 

Whether you’re a DIY enthusiast diving into a home makeover or a professional painter looking to brush up on the basics, you’ll want to understand the ongoing debate between brushes and rollers. In this post, we’ll delve deep into the strengths, weaknesses, and best applications of both tools, ensuring your next painting project looks fabulous and is a smoother, more efficient process. 

Welcome to the Brushes vs. Rollers showdown!

Brushes vs. Rollers

The Basics of Brushes

The essence of a painting task often lies in the detail, and that’s where brushes excel. However, before diving into their pros and cons, let’s first understand the primary types of brushes available in the market.

Types of Brushes

  • Natural Bristle Brushes: These brushes are made from animal hair, often hog, and they’re ideal for oil-based paints, varnishes, and shellac. The natural fibres in these brushes lead to a smooth application and help achieve a fine finish. However, they aren’t recommended for water-based paints as the bristles tend to absorb water and can become limp.
  • Synthetic Bristle Brushes: Made from nylon, polyester, or a combination of both, synthetic brushes are versatile. They work excellently with water-based paints like latex, providing a smooth application. Their durability and the ability to retain their shape even after multiple uses make them popular among DIYers and professionals.

Pros of Using Brushes

  • Precision in Detail Work: Brushes, especially those with finer bristles, are perfect for detailed work. Whether you’re painting a meticulously detailed art piece or working around complex trims and mouldings, brushes allow for higher accuracy.
  • Easier Control in Tricky Areas: Corners, nooks, and intricate trims can be a painter’s nightmare. Brushes, however, provide a level of dexterity rollers can’t match. Their maneuverability ensures every inch, even the tricky ones, gets an even coat.
  • Less Wasteful: Brushes are champions in paint conservation. Since they don’t absorb as much paint as rollers, you can ensure minimal wastage, especially when dealing with expensive paints or varnishes.

Cons of Using Brushes

  • Time-Consuming for Larger Surfaces: Brushes aren’t your best bet for painting larger surfaces. The time and effort required can be exhaustive, especially if you aim for multiple coats.
  • Streak Marks: Brushes demand a certain skill level. If not used correctly, they can leave behind streaks and brush marks, detracting from a smooth finish.
  • Frequent Reloading: A brush can only hold so much paint. This means frequent trips back to the paint can, slowing the process.

The Basics of Rollers

Rollers come to the rescue when it’s time to cover vast expanses of walls or ceilings. Their design and application method ensure large areas get painted swiftly.

Types of Rollers

  • Foam Rollers: Best for smooth surfaces and finer finishes, foam rollers are popular for doors, cabinets, and similar surfaces. They ensure that minimal texture is left behind.
  • Nap Rollers: These rollers have a fabric covering in various pile lengths. The length you choose depends on the texture of your surface: shorter naps for smoother surfaces and longer naps for rougher ones like stucco.

Pros of Using Rollers

  • Fast Coverage: Rollers are undisputed champions when it comes to speed. If you have large walls to paint, a roller ensures you cover more ground in less time.
  • Even Application: When used correctly, rollers provide an even coat, with fewer visible marks than brushes, especially on larger surfaces.
  • Less Fatigue: Painting a large room with a brush can be tiring. With their ergonomic design and broader coverage, rollers ensure the user tires less quickly, making them perfect for bigger projects.

Cons of Using Rollers

  • Messier: Rollers, especially when overloaded with paint, can lead to splatters. This can be particularly challenging if you’re trying to maintain a clean workspace.
  • Not for Details: If precision is what you’re aiming for, rollers fall short. They’re not designed for detailed work or tight spaces.
  • More Paint Initially: Rollers tend to absorb more paint during the initial load, meaning you’ll be using (and possibly wasting) more paint right from the get-go.

Factors to Consider When Choosing Between Brushes and Rollers

Deciding between brushes and rollers isn’t a matter of personal preference alone. There are tangible factors that can guide your decision:

Surface Area

Small vs. Large Areas: Brushes excel in smaller areas, providing attention to detail, while rollers are efficient for covering large surfaces swiftly.

Surface Texture

Smooth vs. Rough: Smooth surfaces like cabinets and doors benefit from foam rollers or fine-bristled brushes. Rougher textures, like brick or stucco, require nap rollers with longer fibres or durable brushes.

Type of Paint

Different paints have varying consistencies. Oil-based paints, for instance, are often best applied with natural bristle brushes, while water-based paints favour synthetic brushes or rollers.

Detail and Precision Required

Detailed work such as trims, mouldings, and patterns mandate the precision of brushes. Rollers won’t provide the necessary control.

Experience Level

Ease of Use for Beginners vs. Professionals: Beginners might find rollers more forgiving on large surfaces, while brushes require a steadier hand and technique. Professionals, with their experience, can extract the best from both tools.

Brushes vs. Rollers

Hybrid Approach: Using Both on the Same Project

Often, a painting project isn’t about brushes or rollers; it’s about brushes and rollers.

  • Brushes for Details and Edges: Begin with brushes to define edges, corners, and details. This “cutting in” process ensures that these tricky areas are well-covered without overlapping onto adjacent surfaces.
  • Rollers for Filling in: Once the edges are defined, rollers can fill in the larger surfaces, efficiently covering vast expanses.
  • Transitioning Tips: Always ensure the edges painted with brushes remain wet when transitioning to rollers. This helps blend and avoids creating visible lines between brush and roller applications.

Care and Maintenance of Painting Tools

Your painting tools are an investment. Proper care can extend their lifespan, ensuring consistent results with each use.

  • Cleaning and Storing Brushes: Rinse brushes thoroughly until the water runs clear. For oil-based paints, use a solvent. Once cleaned, reshape the bristles and hang them to dry. Store brushes in original packaging or wrap them in a cloth to retain their shape.
  • Cleaning and Storing Rollers: Remove excess paint. Rinse rollers until the water is clear. For drying, stand the roller on its end. Store in a dry place.
  • Lifespan of Brushes vs. Rollers: Good quality brushes can last for years with proper care. On the other hand, rollers might need replacement more frequently, especially if used on rough surfaces that wear out the nap.

Brushes and rollers are indispensable threads in the grand tapestry of painting. Choosing the right tool is less about its inherent qualities and more about its suitability to the task at hand. Understand your project, gauge the intricacies, and let the nature of the job guide your hand, be it towards a brush or a roller. 

Most importantly, don’t shy away from experimenting. Sometimes, personal comfort and experience defy logic, and that’s perfectly fine. Every stroke, roll, or dab is closer to turning your vision into a vibrant reality. Happy painting!

Innovative Techniques: Metallic and Textured Effects with Acrylic-Based Colored RenderingInnovative Techniques: Metallic and Textured Effects with Acrylic-Based Colored Rendering


In the ever-evolving world of design and art, standing out requires more than just a splash of colour. It demands innovation, creativity, and a touch of unexpected brilliance. Enter the realm of acrylic-based coloured rendering, a technique that has been transformed from humble beginnings into a game-changer for artists and designers alike. 

This blog post delves into the captivating universe of metallic and textured effects achieved using acrylic mediums. By marrying the iridescent charm of metallics with the tactile allure of textures, one can conjure spaces and artworks that captivate the eye and stimulate the senses. 

Acrylic-Based Colored Rendering

Whether you’re a seasoned artist, an interior design enthusiast, or someone simply curious about the latest decorative techniques, journey with us to explore the magic of melding metallic sheens and intriguing textures using acrylics. Let’s uncover the secrets behind creating masterpieces that shimmer, shine, and surprise!

Understanding Acrylic-Based Colored Rendering

The Story of Acrylics: Acrylic renderings have a rich tapestry of history, with roots tracing back to the mid-20th century. Originally developed as an alternative to oil paints, they provided artists with a faster drying time and a versatility unmatched by other mediums. These paints, synthesized from acrylic polymer emulsions, revolutionized the art world, enabling quick layering and reworking.

Why Acrylic? Acrylics boast a myriad of benefits. Their inherent adaptability allows artists to mimic the effects of oils, watercolours, and gouaches. Their quick drying reduces the waiting period, which is pivotal when layering. Moreover, water-soluble acrylics offer easy cleanup, while their resilience against light ensures the longevity of the artwork. This makes them a favourite for both beginners exploring their creativity and seasoned artists pursuing mastery.

Basics of Coloured Acrylic Rendering: At its core, coloured acrylic rendering is about using tinted acrylic mediums to produce vibrant, textured finishes on surfaces ranging from canvas to walls. This method involves a combination of pigments, binders, and sometimes additional mediums to create desired textures and effects.

The Appeal of Metallic and Textured Effects

The Rising Popularity: Metallic and textured effects have captured the collective imagination of the design world. The allure lies in their ability to reflect light, create depth, and add a touch of luxury to any piece. From a simple gold leaf accent on a canvas painting to a shimmering textured wall in a contemporary living space, the effects are nothing short of mesmerizing.

Applications Across the Board: The application of these effects is not limited to just artwork. Interior designers incorporate metallic and textured finishes to elevate spaces, infusing them with opulence. Furniture pieces, accent walls, and even fabrics are being transformed using these techniques, bridging the gap between traditional and modern aesthetics.

Evolution Over Time: The love for metallics has been timeless, from the ancient Egyptians’ use of gold in their artwork to the Renaissance era’s gilded frames. What’s changed, however, is the technique. With advancements in material science and the introduction of acrylic mediums, achieving these effects has become more accessible, diversified, and refined.

Materials and Tools Required

Choosing the Right Paint: Not all acrylic paints are created equal. Paints with finely ground metal or mica particles are preferred for a metallic effect. Brands often label these as ‘iridescent’ or ‘metallic’, and they come in a plethora of shades, from radiant golds to shimmering silvers.

The Artist’s Arsenal: Achieving the perfect texture or metallic sheen requires diverse tools. Brushes, ranging from broad to fine-tip, allow for detailed work. Sponges can be dabbed or dragged for varied effects. Trowels, especially for larger pieces or wall finishes, help spread and lay the paint.

The Backbone – Primers and Sealers: A masterpiece is only as good as its foundation. Primers ensure the paint adheres well, while sealers protect the finished work. Especially when working with textured finishes, using a quality primer can be the difference between a lasting artwork and a fleeting experiment.

Techniques for Achieving Metallic Effects

The Magic of Mixing: The essence of metallic effects lies in the interplay between mediums and pigments. Depending on the desired outcome, artists can mix metallic paints with clear mediums to either dilute or enhance the shimmer.

Layer Upon Layer: One of the secrets to achieving depth and a multidimensional sheen is layering. One can create intriguing visual effects by overlaying different shades of metallic paints or interspersing them with non-metallic hues.

Going Beyond Paint – Additives and Foils: For those looking to push boundaries, incorporating metallic additives or foils into the artwork can elevate it. When embedded into the acrylic, these elements catch the light differently, offering a unique sparkle.

Patience is Key: Unlike traditional acrylics, metallic ones can sometimes demand longer drying times, especially when layered thickly. Allowing each layer to dry adequately is essential to prevent unwanted blending or smudging. The thickness of each application plays a pivotal role in the final appearance, with thinner layers offering a subtle sheen and thicker ones providing a more pronounced effect.

Techniques for Achieving Textured Effects

Crafting with Tools: The beauty of texture in art lies in its ability to stimulate the eyes and the touch. Sponges, with their uneven surfaces, can create organic, mottled effects. Palette knives, on the other hand, can be employed to scrape, layer, and spread, producing peaks and grooves in the paint, each adding depth and character to the artwork.

Embracing Nature: An avant-garde approach is the inclusion of natural materials into the rendering. When mixed with acrylics, sand can impart a gritty, earthy texture. Wood chips or crushed leaves can be embedded into the wet paint, adding an element of the unexpected and making each piece truly unique.

Acrylic-Based Colored Rendering

Mastering the Layers: As with metallics, layering is a cornerstone technique. By juxtaposing thin, translucent layers with thick, opaque ones, artists can cultivate a topography on the canvas, making the artwork come alive.

Preserving the Art: Textured effects, while captivating, can be more vulnerable to wear and tear. Sealing them with the right varnishes is imperative to ensure they remain undisturbed and protect the textures from external elements.

Combining Metallic and Textured Effects

The Harmonious Fusion: Blending metallic sheens with tactile textures is a balancing act. One must ensure neither overshadows the other. Using a unifying colour palette or complementary shades can produce a harmonious outcome.

The Dance of Layering and Blending: Starting with a textured base and then highlighting with metallic touches or vice versa can lead to stunning results. The trick lies in blending seamlessly so each effect complements the other.

Inspirational Examples: Numerous artists have melded these techniques to great acclaim. From sculptures that shimmer in ambient light to murals that change appearance as one approaches, the examples are myriad and testaments to this combination’s limitless potential.

Maintenance and Durability

Regular Upkeep: As with all artworks, regular cleaning using soft cloths or brushes ensures that dust and grime don’t settle, especially in the textured grooves.

Guarding Against Elements: UV rays can cause colours to fade over time. UV-resistant sealers or displaying the artwork away from direct sunlight can prolong its life. Also, choosing materials that can withstand the elements is crucial for outdoor displays.

Considerations of Wear: High-traffic areas might witness faster wear, especially in interior design applications. Considering the location and expected interactions when deciding the techniques and materials is essential.

Trends and Inspiration

Current Innovations: With ever-evolving technology, new mediums that offer even more brilliant sheens or textures that mimic nature to perfection are continuously emerging.

Cultural Inspirations: From Japan’s intricate gold leafing techniques to the rugged textures seen in African tribal art, there’s a wealth of inspiration to draw from global traditions.

Diverse Applications: While these techniques have found favour in home interiors, they’re also being embraced in commercial spaces. Restaurants with shimmering textured walls, retail stores with metallic accents, and even public art installations are testament to their versatility.

Diving into acrylic-based coloured rendering is not just about creating art; it’s about pushing boundaries, experimenting, and constantly evolving. By combining metallic sheens with varied textures, artists and designers can create pieces that are not just visually stunning but also tactilely intriguing. Whether it’s a canvas, a wall, or an installation, the potential of these techniques is boundless. As with all art forms, the joy lies in the outcome and the journey of creation. So, pick up those brushes, play with those textures, and let the magic unfold!

Choosing the Right Cement Rendering Style for Your HomeChoosing the Right Cement Rendering Style for Your Home


The façade of your home is the first thing that greets visitors and passersby. It’s the canvas that showcases your style and sets the tone for the rest of the property. One of the most effective ways to enhance the exterior appearance of a residence is through cement rendering.

Cement rendering involves applying a premixed layer of sand and cement to brick, mud brick, or stone surfaces. But it’s not just about protection—it’s an art. The aesthetic potential of cement rendering is vast, with numerous styles and techniques available to cater to different tastes and home architectures. However, with so many options, homeowners often find themselves overwhelmed. In this guide, we’ll unravel the intricacies of cement rendering, exploring its benefits, delving into different styles, and offering insights into making the perfect choice for your precious abode.

Cement Rendering Style for Your Home

Whether renovating an old gem or building a new haven, let’s embark on this journey to discover how you can elevate your home’s appeal with the right rendering style.

Understanding the Basics of Cement Rendering

Cement rendering is applying a mixture of sand, cement, and sometimes lime or clay to the exterior surfaces of buildings, primarily to provide a smooth or textured surface. The main purpose of this technique is to protect the building from external elements, such as rain and wind, while enhancing its aesthetic appeal.

Historically, rendering has its roots in ancient architecture. Many ancient civilizations, including the Romans and Greeks, employed various rendering forms to protect their structures from the elements and provide a refined finish. As architectural styles evolved, so did rendering techniques, with each era introducing new materials and methodologies that reflected its design philosophies and technological advancements.

The Benefits of Cement Rendering for Homes

1. Improved Durability and Weather Protection: One of the primary advantages of cement rendering is its enhanced protection against adverse weather conditions. The extra layer helps prevent water penetration, which can lead to structural damage over time. It also protects against erosion from wind and can resist temperature fluctuations.

2. Enhanced Aesthetic Appeal: Beyond its protective function, cement rendering can transform the visual appeal of a building. Whether you’re aiming for a modern, sleek look or a rustic charm, rendering offers a plethora of finishes that can be tailored to suit any design preference.

3. Increased Property Value: A well-rendered home looks good and suggests that the property is well-maintained. This perception can significantly boost the property’s value, making it an attractive investment for potential buyers.

4. Energy Efficiency Benefits: Rendering can also affect energy efficiency. A well-rendered wall provides an extra layer of insulation, helping keep the interiors cool in summer and warm in winter, reducing energy costs.

Different Cement Rendering Styles and Techniques

1. Traditional Cement Rendering: This is the most basic rendering form and has been used for centuries. The finish is typically more textured, giving a natural, rustic feel. It’s ideal for homes aiming for a classic, timeless look. However, it might require more maintenance than other options, especially in harsher climates.

2. Textured Finish: This type of rendering introduces various textures to the façade of the building. From fine grit to a coarser, pebbled look, textured finishes add depth and character. This style can be suited to modern and traditional homes depending on the chosen texture. Considering the overall architectural style and the surrounding environment is essential when opting for a particular texture.

3. Smooth Finish: As the name suggests, this rendering style offers a sleek and polished look. Perfect for contemporary homes, a smooth finish is synonymous with modern urban architecture. However, it may show imperfections more readily than other finishes and could require regular cleaning to maintain its pristine look.

4. Coloured Render: Gone are the days when rendering meant sticking to a palette of browns and beiges. Today, coloured renders allow homeowners to add vibrancy to their exteriors. Available in a wide range of shades, coloured renders can eliminate the need for external painting. However, they might fade over time, so investing in high-quality products and considering maintenance is crucial.

5. Acrylic Render: Acrylic render includes acrylic in the mix, making it more flexible and less prone to cracking compared to traditional mixes. It dries faster, which can be a boon in unpredictable weather. Best suited for homes that experience temperature fluctuations, as its flexibility can accommodate the expansion and contraction of walls.

6. Bagging: Bagging is a technique that gives a more rustic, often slightly irregular finish. Typically, a thinner mix is used, and the application is done using a sponge or cloth, resulting in a textured, old-world charm. It’s a style that can be particularly suited to country homes or those seeking a vintage appeal.

7. Trowel Finish: This is a classic rendering style, where the mix is applied with a trowel to give a smooth finish, often with slight intentional irregularities for character. It’s a versatile style that can be adapted for traditional and modern homes, balancing the rustic charm of traditional rendering and the sleek appeal of modern techniques.

Factors to Consider when Choosing a Rendering Style

1. Home’s Architectural Style: Look at your home’s architectural design before settling on a rendering style. A contemporary home might benefit from a sleek, smooth finish, while a classic or vintage design might lean more towards traditional or bagged rendering. The rendering should complement and enhance, not clash with, the overall design aesthetic of your home.

2. Climate and Weather: The geographical location of your home plays a significant role in your choice of rendering. An acrylic render, known for its flexibility, can be ideal in areas with frequent temperature fluctuations. On the other hand, homes in more temperate climates might fare well with traditional rendering.

3. Maintenance Level: Some rendering styles, like a smooth finish, may show dirt and imperfections more readily and require regular cleaning. Consider the amount of upkeep you’re willing or able to commit to before making a choice.

4. Budget Constraints: As with any home improvement, budget is a key factor. Some rendering styles can be more cost-effective in the short term but may require more maintenance in the long run, leading to more expenses. It’s essential to balance initial costs with potential long-term savings and benefits.

5. Future Plans: If you’re considering selling your home, consider the potential resale value. A well-rendered home can significantly boost property value, but choosing a style with broad appeal is crucial.

Working with Professionals

1. Importance of Consulting with Experienced Professionals: Rendering is a task best left to professionals. An experienced contractor will not only ensure the job is done right but can also provide invaluable advice on the best style and technique for your home.

Cement Rendering Style for Your Home

2. Tips to Find and Vet Potential Rendering Contractors: Personal recommendations are gold. Ask friends, family, or neighbours for referrals. Online reviews and local forums can also provide insights. When meeting potential contractors, ask for references and past project photos to gauge the quality of their work.

3. The Value of Getting Multiple Quotes and Reviewing Portfolios: Don’t settle for the first quote you receive. By getting multiple estimates, you can better understand the market rate and make a more informed decision. Reviewing portfolios can also give you a glimpse of the contractor’s range and expertise.

Caring for Your Rendered Surface

1. Maintenance Tips for Longevity: Regular inspection is key to ensure your rendered surface lasts. Check for cracks or imperfections and address them promptly. Seal the rendered surface every few years to maintain its lustre and protective qualities.

2. Cleaning Techniques for Different Rendering Styles: For smooth finishes, gentle washing with a mild detergent can keep the surface looking fresh. Textured finishes require a brush to get into crevices. Always test a small inconspicuous area before cleaning the entire surface.

3. Warning Signs to Look Out For: If you notice large cracks, mould growth, or significant discolouration, it might be time to consult a professional. These could be signs of underlying issues that need immediate attention.

The exterior of your home is its first impression, and cement rendering is an artful way to ensure it’s lasting. With myriad styles and techniques available, the choice can be overwhelming. However, you can make an informed decision by considering factors like architectural style, climate, and maintenance. Remember, while DIY has its merits, rendering is a task best left to professionals. By investing time and resources now, you ensure your home remains beautiful and sturdy for years to come.